The “Mixie Haircut” has emerged as a groundbreaking trend in the hairstyling world, captivating both clients and professional barbers with its distinctive blend of classic styles. This article delves into the intricacies of the Mixie Haircut, offering barbers comprehensive insights into its history, variations, suitability, cutting techniques, styling methods, and maintenance.
The Mixie Haircut is an innovative fusion of the classic pixie cut and the mullet, resulting in a style that is both edgy and versatile. It features shorter lengths at the front and sides, reminiscent of a pixie, while incorporating longer layers at the back, akin to a mullet. This hybrid offers a contemporary aesthetic that appeals to clients seeking a bold yet manageable look.
Historical Evolution of the Mixie Haircut
The origins of the Mixie Haircut can be traced back to the rebellious styles of the 1970s and 1980s, where both the pixie cut and the mullet gained popularity. In recent years, there has been a resurgence of interest in retro hairstyles, leading to the amalgamation of these two iconic cuts into what is now known as the Mixie. Celebrities and fashion influencers have played a significant role in popularizing this trend, showcasing its adaptability across various contexts.
If you’re exploring cutting-edge hairstyles like the Mixie and want inspiration tied to the season, you’ll also love our Top 5 Spring Hair Trends and How to Conquer Each Cut guide.
Professional Step-by-Step Guide to Cutting the Mixie Haircut

Client Consultation and Vision Setting
Begin by engaging in a thorough consultation with your client. This discussion is critical in understanding what they’re aiming for—whether it’s a soft, wearable version of the Mixie or a more dramatic, editorial look. Talk about how much length they’re willing to part with and where they want the contrast between the pixie-like front and the mullet-inspired back to fall. Ask about their daily styling routine, lifestyle, and how much maintenance they’re comfortable with. Fringes should also be discussed in detail, as they define the face and can dramatically shift the overall tone of the cut.
Preparing the Hair for the Cut
After the vision is clear, move on to prepping the hair. Shampoo and condition thoroughly, then towel-dry until the hair is damp but manageable. Comb out any tangles and create clean, strategic sections. This step sets the stage for precision and ensures that the haircut will be balanced and consistent. Divide the head into standard zones: top, sides, crown, and nape. Keep each section neat and secure to allow easy access and visibility while cutting.
Establishing the Nape Length
Start the cutting process at the nape of the neck. This section defines the mullet aspect of the Mixie. Determine the length based on how much drama or subtlety the client wants in the rear profile. Use scissors for a clean line if you want a strong structure or switch to a razor for a more deconstructed, shaggy finish. Work from the center outward to ensure symmetry and then move gradually upward, layering slightly toward the crown while preserving the length at the very bottom to keep the Mixie’s silhouette intact.
Shaping the Crown and Top Layers
Once the back has been defined, focus on the crown area. This is where the pixie energy begins to emerge. Elevate the hair vertically and begin layering to build a rounded, voluminous shape. Use point-cutting techniques or a razor to add softness and movement. Pay attention to the natural growth direction to avoid cowlicks or unwanted bulk. This part of the haircut needs to integrate naturally with both the shorter sides and the longer back while still maintaining visual interest and flow.
Tapering the Sides and Creating Contour
Move next to the side sections. Here, you want to maintain the shorter, tighter appearance that reflects the pixie component of the cut. Use controlled, scissor-over-comb or razor techniques to sculpt the hair close to the head, gradually blending it into the top and crown. The goal is to create contour around the temples and cheekbones while allowing enough length to support fringe blending or soft sideburns, depending on the final desired shape.
Designing the Fringe
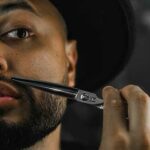
The fringe is a defining feature in most Mixie haircuts and offers a wide range of customization. Decide on the fringe style based on the client’s face shape, hair texture, and personality. For accuracy and control, it’s often better to cut the fringe dry, especially if the hair has any natural wave or curl. Comb the fringe area down and assess the appropriate starting length. Then carefully trim using a razor for a wispy finish or scissors for a structured look. Blend the outer fringe edges into the side sections to maintain harmony and frame the face beautifully.
Blending and Texturizing the Entire Cut
After establishing the foundational shape, comb through the entire haircut to assess weight distribution and movement. Identify any bulky areas or harsh lines that need refining. Use point cutting, thinning shears, or razor work to blend sections more organically and remove unnecessary bulk. This is especially crucial in thick hair, where too much structure can lead to stiffness. Adjust volume and texture based on the client’s styling habits and preferences. This finishing process transforms the haircut from technical execution to a wearable, stylish shape that moves fluidly. Using a professional combs for thick hair is recommended.
Final Styling and Presentation
With the haircut complete, proceed to styling. Blow-dry or diffuse the hair depending on the client’s texture and desired finish. Apply lightweight products such as texturizing sprays, mousses, or soft waxes to enhance the natural movement of the layers. Emphasize the separation in the fringe and crown areas to highlight the Mixie’s dual personality. The final look should celebrate contrast—sharp yet soft, structured yet airy.
Common Mistakes to Avoid
Avoid common pitfalls when cutting a Mixie. Over-texturizing can lead to a lack of structure, while insufficient blending may result in harsh lines.
Ensure the transition between the pixie and mullet elements is seamless. Always consider the client’s hair texture and density to tailor the cut appropriately.
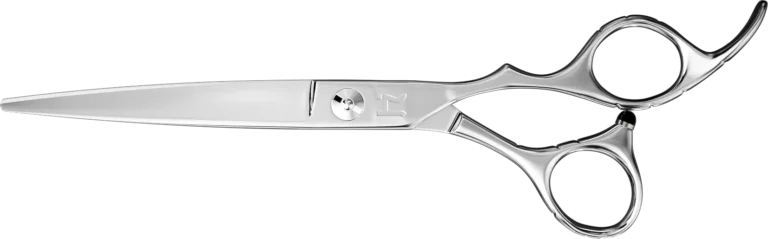
Tools For Cutting Mixie Haircut
For professional barbers aiming to master the Mixie haircut—a fusion of the pixie and mullet styles—selecting the right tools is paramount. Hattori Hanzo Shears offers a range of high-quality shears tailored for precision, texture, and control, essential for executing this intricate style.

The HH1 Kamikaze is renowned for its precision in crafting short hairstyles like the Mixie. Its sharp blades and ergonomic design facilitate clean cuts and detailed work, making it ideal for shaping the pixie elements of the Mixie haircut.

To seamlessly blend the varying lengths characteristic of the Mixie, the HH14T Blending Shear is indispensable. Its design allows for smooth transitions between layers, ensuring a cohesive and natural look.
Face Shape & Hair Texture Suitability
Understanding the compatibility of the Mixie Haircut with different face shapes and hair textures is crucial:
- Face Shapes:
- Oval: Most variations complement this balanced shape.
- Round: Opt for longer layers at the crown to elongate the face.
- Square: Soft layers around the face can soften angular features.
- Heart: Wispy bangs or face-framing layers help balance the forehead and chin.
- Hair Textures:
- Fine Hair: Subtle layering and texturizing create the illusion of volume.
- Thick Hair: Pronounced layering removes bulk and adds shape.
- Wavy/Curly Hair: A shaggy Mixie enhances natural texture and movement.
Frequently Asked Questions (FAQs) About the Mixie Haircut
Q1: Is the Mixie Haircut suitable for all hair types?
Yes, the Mixie Haircut can be adapted for a wide range of hair types including straight, wavy, and curly textures. For fine hair, strategic layering and minimal texturizing help build volume. For thicker or curly hair, razoring or thinning techniques reduce bulk while enhancing the haircut’s natural movement. The key is to tailor the structure based on density and curl pattern.
Q2: What face shapes work best with a Mixie Haircut?
The Mixie is quite versatile and can be customized to flatter nearly all face shapes. Oval faces typically suit most variations, while round faces benefit from added crown volume to elongate the appearance. Heart-shaped faces look great with softer fringes to balance the forehead and chin. Square jawlines can be softened by feathered layers around the face.
Q3: How often should clients get a Mixie trimmed?
To maintain the shape and integrity of a Mixie, clients should return for a trim every 4 to 6 weeks. This helps preserve the proportion between the pixie and mullet sections and prevents the fringe or crown from growing out unevenly. Regular maintenance also ensures the layers stay sharp and textured.
Q4: Can the Mixie Haircut be styled easily at home?
Absolutely. One of the reasons the Mixie is so popular is its styling versatility. Clients can enhance volume with a blow-dry and round brush for a polished look or apply texturizing spray and air-dry for a more tousled, casual aesthetic. The key is using the right products for their hair texture and educating them on daily styling techniques during their appointment.
For best haircutting results and client satisfaction, use Hanzo Shears.